I’m looking to install a dashcam into my precious DS4. In my previous car I had it ‘hardwired’ into a fuse that was only enabled when the ignition is turned on. I would like to connect it in the same way again.
Anyone knows which fuse from the internal fusebox to pick? Or someone has a diagram of the fuse box so I can find a suitable one myself?
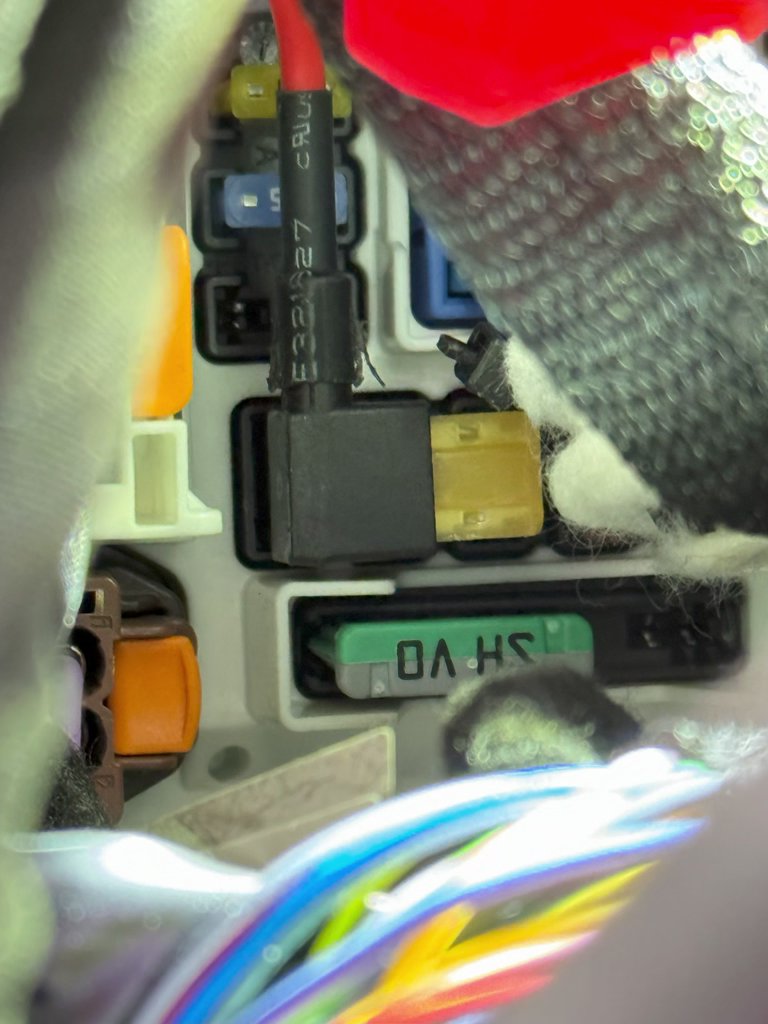
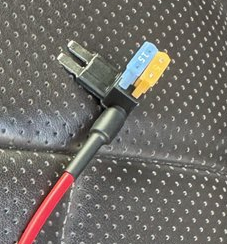
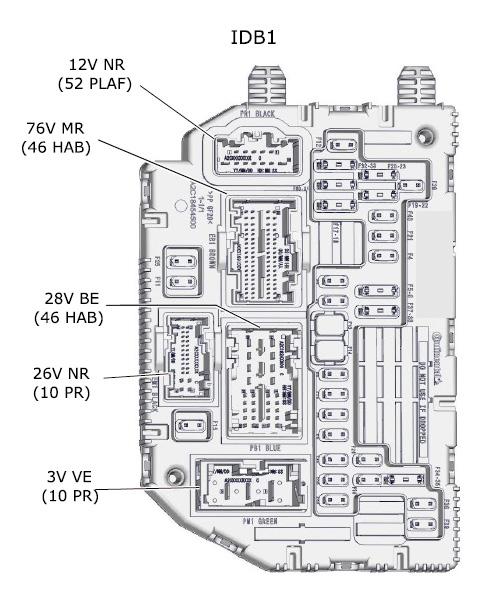
Only had a piggyback cable lying around for a Mini/APM type of fuse, but if I’m not mistaken the marked fuses are all Micro2 fuses. New cable on the way!
Okay that took a little longer than I hoped, but I promised to report my findings
I got the Viofo VS1 as dashcam, it’s brand new and nice and compact. I got it working perfectly, the camera is in parking mode (timelapse recording) when ignition is off, and when ignition turns on, the camera starts recording immediately
I’m giving you some pointers on how to get it to the place I put the dashcam, which is behind the rearview mirror on the passenger’s side. This way it doesn’t obstruct the driver’s view.
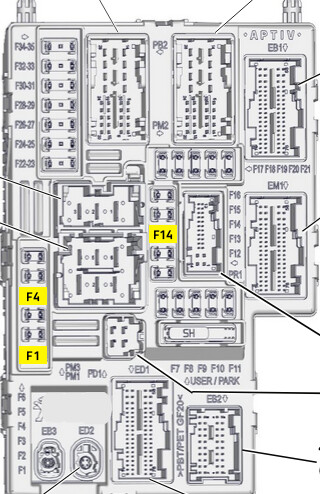
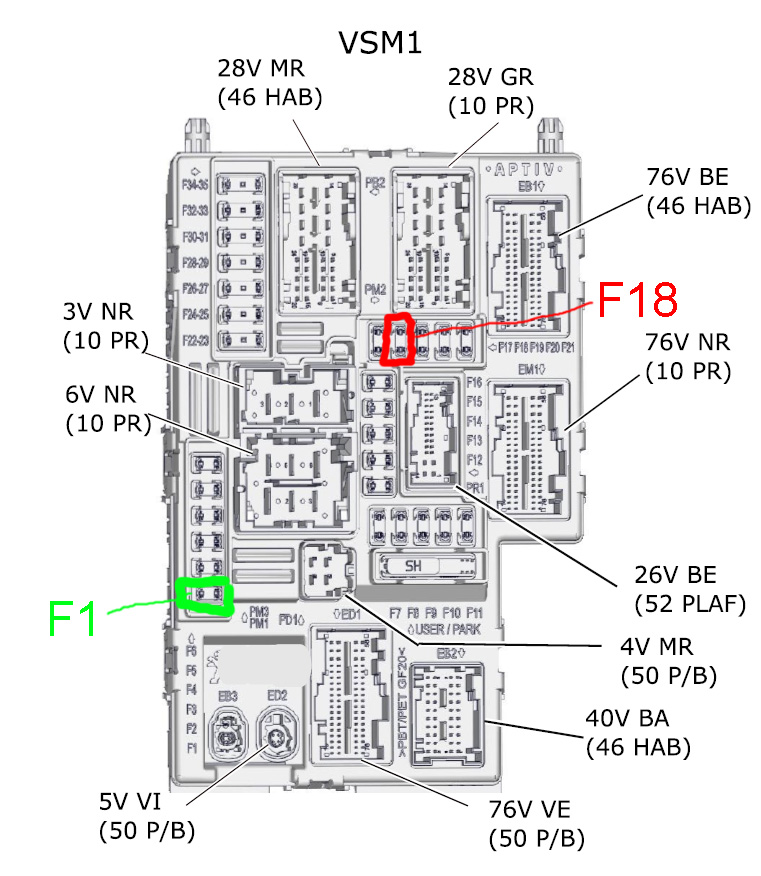
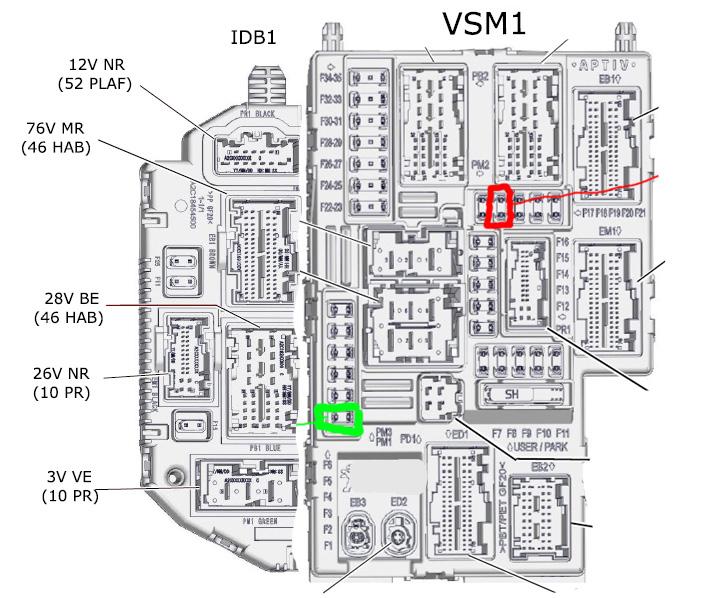
Had a little trouble getting the piggyback cables in there due to lack of space and big hands, but I got them in there. I chose fuse F7 for continuous power and F4 for switched power (refer to @alexm’s diagram above).
There’s a screw to the bottom-right of the fuse box, you can use that as a neutral line. Or any other bare stretch of metal of course.
Then routed the USB cable upwards through a hole in the dashboard below the A-pillar. Ah yes, the A-pillar. BEWARE, this thing is a *** to take off, I ended up breaking the connector of the tweeter. Duct tape to the rescue! Tuck the USB cable in between the others so it doesn’t rattle about while driving. When that’s in place, very carefully put back the A-pillar, not jamming anything or cracking more. Generally, just do it better than I did.
Carefully pry open the plastic housing behind the rearview mirror, which houses the car’s camera
Continue tucking in the cable above the windscreen, all the way to the passenger side of the rearview mirror
Then you’re gonna put back the plastic housing with the USB cable sticking out on the side, just long enough so it’s going to reach the base of the dash cam. Assuming you’ve already thought of the place you’re going to put the dashcam
You should be good now, put it to the test!
I’ve made some pictures for reference. Good luck if you’re going to try it yourself!
Hi!
the thing is that: F7 has a 25A fuse. I do not know what its connected too but could be sothg importend. Its NOT recommended to use a Fuse which is security relevant I could damage sthg or loose garanty!
So it would be fantastic if someone could provide which for the fuses F7 - F11 are used for! teher is a 3A fuse - F9 - I would guess thats maybe the light or sthg, but not sure…
You use F7 as a power source for two lines. For the old line, you leave 25A and for the new one for dashcam, e.g., 5A using the cables shown in the previous photos.
The second option is to use a multimeter to find a free space in VSM1 and take power from it, but it depends on the engine version and equipment of your DS4
Hi,
the princip is clear for me, but I am shy to use a security relevant system like airbag, assistent system , wheel, or what ever it is. If there is any problem caused by this you (the owner) are f**** up!
I have an E-408 which uses the same box - as far as I can see.
Do you know whats connectes on that 3A fuse? That could be a system like the lights or sthg not important. That fuse assignment seems to be a big secret!
Safetly for +ACC you can use F1 5A. It’s ligts in central and passenger dashboard storage compartment and USB4.
For +BAT - F18 10A. It’s +12V for OBD diagnostic socket.
For +APC - F17 15A (next on the left at F18). It’s electrochromatic rearview mirror.
Forget about 3A fuses because there is for example engine start switch, calculator helps to respect inter-vehicle time, multifunctional video camera
Hi Andrew
thank you - that helps
Could you be so nice and provide alle fuse functions?
How did you change the fuses? do you hav a special tool? its so damn hidden,
thanks a lot
Michael
Ok, I understand - wich language?
If you have some time then F7-F11 would be nice, but F18 sounds good.
I ll try it with that - hope there is enough room.
kr
michael
Thanks a lot Andrew. Yesterday I did the installation. I buyed some special long tongs to even have a chance to reach the fuses!
It was a horror - take me about 1 hour and a lot of bad language. I used F18 and F1.
It works but I was not sure if the current thief is real well plugged - you can not see anything.
I would not recommend it to anyone. I would use a ODB Connector next time.
It was mine, I bought the power suply before I got my car - the Peugeot E408 -.
I thought the fuse box will be easy reachable on the side, like seen in many yt videos. But Peugeot does not so anymore.